


Products in this article:

Japan is known for its fermented foods, like natto or miso. And like natto and miso, pickled vegetables are a standard part of the Japanese diet. In this article, I'll tell you my experience making nukazuke--a styling of pickling--and how you can make your own pickled vegetables using the Nukazuke Bijin.
What is Nukazuke?

Nukazuke is a type of fermentation that uses a mixture of rice bran, salt, and water to ferment vegetables. The name nukazuke comes from the Japanese word "nuka," which refers to rice bran. The rice bran mixture is also called nukadoko or nukamiso. Vegetables are buried in the nukadoko, and the fermentation process takes place over a period of several days to a few weeks, depending on the vegetable and the desired level of fermentation.
Some of the most popular vegetables for nukazuke include cucumbers, carrots, radishes, turnips, eggplant, and cabbage. Nukazuke pickles are known for their unique texture, which is both crunchy and tender, and their complex umami flavor.
Just like "normal" pickles, nukazuke pickled vegetables aren't going to be a main course. Pickles in the west are like condiments slapped on hamburgers. In Japanese restaurants and resorts, they are served as appetizers or as small side-dishes.
Why eat nukazuke?

In Japan, the necessary ingredients for making nukazuke pickles are easy to find. The rice bran can be bought in any supermarket, and premade nukazuke mixtures are also readily available.
In western markets, rice bran is a specialty product. You'll need to search for it in Asian grocery stores. In fact, finding the rice bran will likely be the most challenging part of making nukazuke.
So the question is: What's the payoff for finding the bran and making nukazuke?
- Health benefits. Nukazuke pickled vegetables, like natto and miso, are fermented. The bacteria that ferment the vegetables are great for gut health.
- New possibilities. If you have the rice bran and other nukazuke ingredients, you can pickle any vegetable. If you're vegetarian, this might be an important factor for you.
- Preserving produce. If you grow your own food, you might want to learn some new, interesting ways to preserve your produce.
- Unique dining experience. If you are serving Japanese food at a dinner party, nukazuke can be the cherry on top to complete the experience.
Before venturing to the Asian grocery store on a quest to find the nukazuke ingredients, you need to decide if the potential payoff for the work is likely to be worth it to you.
Nukazuke recipe

Before you can make nukazuke pickles, first you need to prepare the pickling mixture. In this article, I used a pre-made nukazuke mixture called nukazuke no moto, but if you don't have access to such a pre-made option, you can make your own. Here is a recipe for the nukazuke mixture:
- 800g (approx. 3.5 cups) rice bran
- 800ml (approx. 3 cups) water
- 105g (approx. 1 cup) salt
- 2 whole red chili peppers
- 5g (1 tsp) kombu (dried kelp)
- 1 dried shiitake mushroom
- 5g (1 tsp) bonito flakes
Place the rice bran, salt, and other dry ingredients in a large bowl and mix.

Add the water and mix until all the ingredients are wet.


Place about two-thirds of the nukazuke mixture into the Nukazuke Bijin container.


Set whole vegetables down in the bed of nukazuke along with the included drainage bowl


Use the remaining nukazuke to bury the vegetables. Make sure holes of the drainage bowl are near the top of the nukazuke mixture.

Seal the container with the lid and store it for several days to several weeks, until they have achieved your desired level of fermentations.
The nukazuke can be stored at room temperature or in the refrigerator.
ROOM TEMPERATURE: Once a day, take vegetables out, discard the liquid in the included drainage bowl, and stir the nukazuke, making sure to bring the bottom portion of the mixture up to the top.
REFRIGERATED: Once every three or four days, take vegetables out, discard the liquid in the included drainage bowl, and stir the nukazuke, making sure to bring the bottom portion of the mixture up to the top.
Maintenance: The nukazuke mixture can be used for years, but mold may form in it. Throw the moldy parts away and add more nukazuke mixture and water as necessary.
Let's get pickling

Like most people, before writing this article, I'd never pickled a vegetable in my life. My mother-in-law is a seasoned pickler, however, so let me pass her knowledge and my experience on to you.
The nukazuke mixture should be moist. When I made it, it had the consistency of moist corn meal. The main ingredients are the rice bran and salt. They do the work of pulling moisture out of the vegetables and fermenting them. If you have ever had a pet bird, the rice bran will have a familiar scent: the faint smell of bird seed.
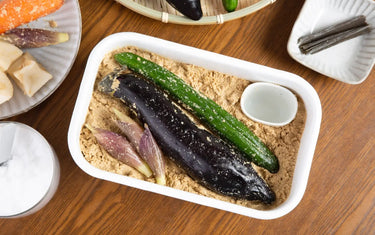
I placed about two-thirds of the mixture into the Nukazuke Bijin, then placed the special cup that comes with it into the corner of the container. The nukadoka–the soft bed of nukazuke for the vegetables to lay it–was complete.
The Bijin is an enamel-coated steel container. The enamel doesn't take on the scent of the nukazuke or the vegetables, so you can use it for a long time without any weird smells building up and seeping into the vegetables. The small bowl included with the Bijin is designed to help you drain the vegetable juice that is drawn out by the salt.
Next, I cleaned the vegetables and then placed them whole inside the Bijin and pushed them down a bit. Finally, I buried them with the remaining nukazuke mixture. Two things to keep in mind:
- The vegetables should be fully covered with nukazuke.
- The cup should be buried just up to the holes near the top. The vegetable juice will drain into the cup through the holes.
After covering the vegetables, I packed the nukazuke down a bit, put the lid on, and put the Nukazuke Bijin into the fridge.
A few days later, I had a pickled carrot, eggplant, and cucumber.
What's it taste like?

Vegetables pickled via nukazuke are known for being both soft and crunchy. As you might expect, they are also saltier than a raw vegetable. The nukazuke vegetables I made retained much of their raw flavor, but were salty. The nukazuke cucumber didn't taste like a pickle, it tasted like a salty cucumber. You can adjust the saltiness of the vegetables by increasing or decreasing the amount of salt in the mixture.
The longer you leave vegetables in the nukazuke, the more the flavor will transform. The vegetables I fermented for only a few days, hence the nukazuke cucumber tasted like a salty cucumber. Leave the vegetables in longer to experience different flavors.
Maintaining the nukazuke


While the process of making nukazuke pickles is fairly simple, the mixture needs to be maintained. If you store your nukazuke at room temperature, you'll need to remove the vegetables and stir the mixture from-bottom-to-top. If you refrigerate the nukazuke, you only need to mix it every three or four days.
The nukazuke mixture can be used for years, but mold may form in it. Throw the moldy parts away and add more nukazuke mixture and water as necessary.
Conclusion

If you find the rice bran and do the work to maintain the nukazuke, you will be rewarded with a unique and healthy Japanese food. After trying more standard nukazuke vegetables, like carrots and cucumbers, you can try pickling your other favorites. What does a nukazuke pickled onion taste like on a cheeseburger? There's only one way to find out...
