


Products in this article:


Unfinished Business


In a previous article we wrote a detailed guide for how to make umeboshi–pickled plums. Pickled plums are most well known as a filling for onigiri (sometimes whole, sometimes mashed), but are useful in many other kinds of dishes like rice porridge or somen. In this guide we will show you how to complete the process of sun-drying the umeboshi and some extra information on storage, aging, and tips for making the very best umeboshi in town.
There will also be some information about how to make use of the red shiso at the end.
The Procedure and Tips for Sun-Drying

Sun-drying, or “doyoboshi” is the final stage in umeboshi making after the plums have been salted and pickled in red shiso vinegar. This step not only preserves the plums but also enhances their flavor and texture. Here’s how to do it right.
Timing for Sun-Drying
The ideal time for sun-drying umeboshi is during the doyo period, typically around late July to early August in Japan, right after the rainy season ends. This is when the sun is strongest, helping to dry the plums effectively while killing off any bacteria. Aim for 3-4 consecutive sunny days with low humidity. If the weather doesn’t cooperate, you can delay it, but traditionally, it’s done during this hot spell for optimal results.
Essential Tools
You’ll need simple, breathable equipment to allow air circulation: - Bamboo baskets (zaru): Flat-bottomed and shallow ones are best for even drying. - Netting or drying racks: These prevent insects and allow airflow from below. - Tongs or gloves: For handling the delicate plums without bruising them. - Newspaper or trays: For indoor storage if needed.
Avoid metal trays as they can react with the acidic plums.
Frequency and Timing for Turning the Plums

To ensure even drying, turn the plums several times a day–ideally 2-3 times: once in the morning, midday, and late afternoon. Morning turns are crucial when there’s still some dew, as it helps maintain moisture in the skin. Consider the airflow variations: mornings and evenings have cooler, gentler breezes, while midday offers intense sun. Always handle gently with tongs to avoid tearing the skin. On the second day, some people leave them out overnight to absorb night dew, which softens the skin for a plumper finish.
Weather Precautions
Weather is key–choose clear, hot days with no forecast of rain. If a sudden shower hits, quickly move the plums indoors to a well-ventilated area and pat them dry with paper towels if they get wet. To combat night dew, traditionally, bring them inside at dusk or cover with breathable cloth. High humidity can lead to mold, so monitor forecasts closely. If it’s too windy, secure the setup to prevent plums from rolling off.
Storage Methods After Drying
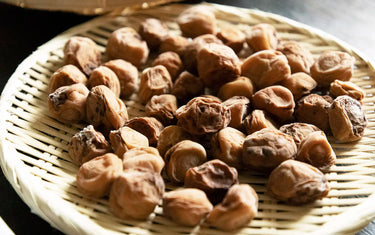
Once the plums are dried–typically after 3-4 days when they’re wrinkled but still plump–it’s time to store them. The method you choose affects texture and longevity.
Returning to Plum Vinegar vs. Storing Dry
- Returning to umezu (plum vinegar): Soak the dried plums back in the red shiso-infused vinegar for a day or two. This results in moister, softer umeboshi with a vibrant red color and balanced tanginess. It’s preferred by those who like juicy plums that are easier to eat.
- Storing dry without returning: Keep them as is for a drier, crispier texture. This is favored for longer shelf life and a more intense, concentrated flavor. Preferences vary: moist lovers go for the vinegar soak, while crunch enthusiasts opt for dry storage.
Either way, use clean, airtight glass jars or ceramic containers.
Aging Period and Flavor Changes
Age the umeboshi in a cool, dark place for at least 1-3 months, but ideally 1-3 years for peak flavor. Over time, the taste mellows: the initial sharp saltiness and acidity soften into a rounded, umami-rich profile. By year one, it’s milder and everyday-friendly; by year three, it’s nectar-like with a sticky texture. Monitor for any off smells, but high-salt umeboshi can last indefinitely if stored properly.
Changes in Taste and Appearance

The drying process transforms the plums dramatically, turning them from simple salted fruit into the beloved umeboshi.
Differences Before and After Drying
- Color: Pre-drying, the plums are pale or whitish from salt. Post-drying, they turn a deep reddish-pink from the shiso, with a glossy sheen.
- Aroma: Before, it’s mostly salty and vinegary; after, a fruity, floral scent emerges, intensified by the sun.
- Texture: Freshly pickled plums are firm and juicy. Dried ones become wrinkled, leathery on the outside but soft inside, with a chewy bite.
Changes Until Ready to Eat
It takes about 1-3 months for flavors to meld fully, but you can taste-test earlier. Initially pungent, the taste harmonizes over time, with salt integrating into the fruit’s sweetness. For the best experience, wait until the edges soften and the overall profile becomes balanced–perfect for rice balls or tea.
White Residue

Some of the umeboshi will have a white residue on the outer skin. This is salt from the pickling vinegar, not mold. Umeboshi with the white salt residue are perfectly fine to eat.
Common Failures and Remedies
Even seasoned makers encounter issues, but most are fixable with quick action.
Black Pickled Plums

- Cause: Rough handling of fresh plums.
- Prevention/Remedy: You’re working with large amounts of plums, so it isn’t surprising if you have a few bruised ones here or there. To limit the amount of black pickled plums, avoid handling the plums too roughly while they’re fresh.
Mold Growth
- Cause: High humidity during drying or poor sanitation.
- Prevention/Remedy: Dry on sunny, low-humidity days and sterilize jars with boiling water. If mold appears, discard affected plums immediately to prevent spread; for minor cases, wipe with shochu (Japanese spirit) and re-dry.
I just want to reiterate: If some of your pickled plums have a white residue on the outside, don’t worry. That’s salt from the pickling vinegar, not mold.
Overly Wrinkled or Dry Plums
- Cause: Excessive drying time or forgetting to turn them.
- Prevention/Remedy: Check daily–plums should wrinkle but retain some give when pressed. If too shriveled, mist with shochu or return to vinegar for 2-3 days to rehydrate. Night exposure to dew on day two can prevent this.
General tips: Start with fresh, unblemished plums, maintain hygiene, and don’t rush the process.
Don’t throw away that shiso!

Red shiso is the herb used for turning the umeboshi red. As is typical of traditional foods like umeboshi, nothing is wasted, and that is true of the shiso as well. The shiso has been imbued with the salt and vinegar of the pickling process. A common use for the shiso is as a condiment for rice called furikake.
Here’s how to make your shiso furikake:
Dry

Just as with the umeboshi, you want to dry the shiso, following the same steps above.
Blend

Take the dried shiso, place it into a food processor, and blend it into a semi-fine powder perfect for sprinkling on bowls of rice or even onigiri. Unblended shiso is edible, but not very pleasant to look at or chew.
More Reading
This may be the end of the umeboshi-making process, but it is just the beginning of your journey in plum and pickle enjoyment.
Umeboshi is commonly used in onigiri, but you can also enjoy it as a flavor-enhancer for somen. If you’re looking for a bento box to pack your onigiri in, consider a magewappa. If you want more ways to use your excess plums, consider making umeshu. And of course, if you need more pickled foods in your diet, then it’s time to learn how to make nukazuke.
