


Products in this article:

Make Yakiniku Anywhere

Americans like big grills for barbequing lots of hamburgers, steaks, etc. with a captain at the helm making the summertime weekend dream come true. Does your crew of 10 need burgers, hot and ready to serve all at the same time? You, the captain, and your big ol' grill can turn your backyard into burger paradise in a snap.
However, the Japanese style of yakiniku is more personal and communal. Every man and woman is the captain of her own ship and they all set sail together. Your crew will huddle around the grill together, busily flipping and then munching their little mouthfuls of meat and vegetables for an hour.
One of the advantages of the Japanese style is that is allows you the freedom to use a smaller grill, a critical feature in Japan given the storage size constraints in the land of the rising sun. That opens up the possibility of easily taking your yakiniku set on the go to a camp site or your friend's backyard.
Getting down to diatomaceous earth
That's where the Kinka Charcoal Grill comes in. It's made of diatomaceous earth, a material that has the quality of being very porous. That just means that it holds a surprising amount of air. You might have seen bath mats made of diatomaceous earth. You drip some water on that sucker and it just soaks it right up.
Because diatomaceous earth is so airy, it's also light and an excellent heat insulator. The Kinka grill is easy to carry and stays hot for a long time while using very little charcoal. Altogether, it looks very promising as a portable yakiniku grill.
Using the Kinka Grill
You know now that the experience of grilling with the Kinka is more personal and communal, but let's take a look at the details of using the grill and see if it lives up to the promise.
The Design

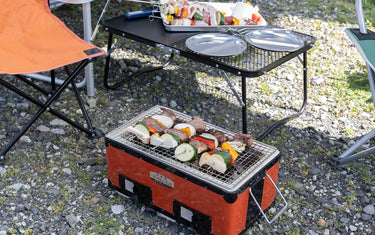
First, let's take a look at the design of the Kinka. The grill itself is narrow and rectangular. Although you can slap bits of food willy-nilly anywhere you want, if you want to quickly and efficiently use the space and heat it produces, you'll want to make kebabs. Kebabs let you squeeze more food onto the grill, and they allow you to quickly rotate large amounts of bite-sized food all at once without the risk of dropping the food on the ground.
On the outside, the grill grate sits on top. The body of the grill doesn't have a slot for the mesh to sit in. In our time using it, I found that the mesh tended to travel a bit, although we never were in danger of spilling.
The body of the grill has two windows corresponding to the two chambers inside the grill. The windows are used to adjust the amount of air the blows under the fire. In other words, you use the windows to control the heat of the fire.
The two inner chambers are separated by a diatomaceous earth wall that doesn't quite go all the way to the top. At the bottom of both chambers is a metal plate with several large holes in them. Charcoal sits on top of the plates, allowing air to blow under the fire.
The grill doesn't have any legs, so we placed it on the ground. However, it's possible to place it on a table if you wish.
Starting a fire


When you look at the grill in-person, there doesn't appear to be much room for charcoal. Each chamber fits about three or four large piece of charcoal and a few smaller pieces on the periphery. How can that possibly be enough room to get a good fire going?
The answer is: It's more than enough. As I said before, diatomaceous earth is an excellent insulator of heat. While cooking, the sides of the grill never became too hot to touch. Yet, if you're not careful, your fire will get way too hot. We had that problem when we used another diatomaceous grill that had a much more spaceous inner chamber.
When starting a fire, you often have to first build a structure conducive to a nice healthy fire. The tight space inside the Kinka makes building a fire a breeze. Your charcoal can lean on any of the chamber walls, but the middle wall separating the two chambers is especially good for that purpose. I was able to start the fire quickly thanks to the narrow space and the airy under-chamber.
Once I had a fire going, we got busy cooking. I learned from my previous experience with diatomaceous earth grills that the fire can get out of control, especially with a bit of pork or chicken fat, so I was cautious with how much charcoal and food I loaded up at the beginning. We greased the grill grate with some pork and found that the fire was a bit cool, so I added a bit more charcoal. The fire heated up quickly and we had some pork ready to eat. If you are new to diatomaceous earth grills, I advise you to build the fire up with similar caution to avoid making a fire that's too hot to use.
Cooking


Next were the kebabs, the main course. We tried both short, single-pronged kebabs and larger, dual-pronged kebabs. I found the dual-pronged kebabs to be easier to use, but they stuck out the sides of the grill by a lot. However, we were able to cook some beef, pork, and vegetables to perfection with very little effort using both types of kebabs.
The diatomaceous earth walls of the Kinka grill directed most of the heat of the fire up at the food, and both chambers were almost completely evenly heated. I purposefully built the fire to be hotter near the center of the grill and cooler around the edges to make it easier to cook different kinds of food at their own pace. Chicken and pumpkin at the edges for longer cooking, beef, pork, and onions near the middle for fast cooking. However, it would have been trivial to spread the heat evenly around both chambers if I wanted to.
We also cooked without kebabs. My beautiful wife dropped some food on the ground, but otherwise it was an okay experience with just a small group. However, if you are trying to cook with a larger group of people, the kebabs are really a must.
As is tradition in Japan, after the meat and vegetables were consumed and the fire was weakening, we brought out the onigiri. Yaki onigiri is a popular end-of-meal finisher. It lets you fill your belly and use up the final bits of heat in the fire. One problem with yaki onigiri is that if you lift it off the grate too soon after placing it, you're likely to make a big mess. Rice sticks to the mesh. However, once it's been cooked enough, yaki onigiri will come off the mesh easily. But how do you check if it's ready? Just lift the whole mesh up! That was a useful little trick I discovered. You'll need a grate lifter to do that, though.
Final Thoughts

Using the Kinka grill was a pleasant experience. Because of its size and weight, I can easily imagine taking it on a trip even in a smaller Japanese car. Storage is also much easier compared to a large American-style grill. And compared to other grills of this kind, the Kinka is very affordable. If you are in the market for a portable grill to make the most of the outdoors this summer, buying the Kinka is a no-brainer.
